It is quite easy and quick to set up PnP PowerShell on a local system and start using it. Considering that PnP PowerShell has been gaining a lot of momentum among Devs and Admins, thought it would be good to have a post for everyone’s reference.
So why PnP PowerShell? Because it is the recommended and most updated PowerShell module for IT Pros to work on SharePoint Online, SharePoint On-premises and Office 365 Groups. It allows us to remotely mantain the SharePoint and Office 365 tenancy as we will see below.
Installation:
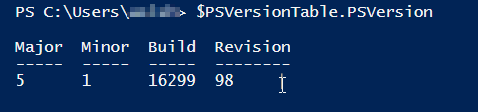
First, we have to make sure that we have the latest and greatest version of PowerShell (at least >= v4.0) on the system. We can simply check it using the following command $PSVersionTable.PSVersion which will give the output below.
If your version isn’t sufficient, then go to this link to upgrade – https://www.microsoft.com/en-us/download/details.aspx?id=40855. Since there are OS requirements accompanied with PowerShell, please make sure to check the System Requirements in order to make sure the OS matches the specs.
Also, I would recommend installing SharePoint Online Management Shell because there are various Tenant commands that you may not find in PnP PowerShell. The link can be found here – https://www.microsoft.com/en-au/download/details.aspx?id=35588. Again, make sure to check the System Requirements in order to make sure the OS matches the specs.
After you have the proper PowerShell version, run the following commands to install the PnP PowerShell module depending on if you’re using the Online or On-Premise version. You only need to install the version(s) you need to interact with (no need to install on premise versions if you’re only working online).
| SharePoint Version | Command to install |
|---|---|
| SharePoint Online | Install-Module SharePointPnPPowerShellOnline |
| SharePoint 2016 | Install-Module SharePointPnPPowerShell2016 |
| SharePoint 2013 | Install-Module SharePointPnPPowerShell2013 |
It will take few mins to run and complete the above commands, then it will ready for use.
Get Started guide:
To start using PnP PowerShell, first we will have to understand how does PnP PowerShell works.
PnP PowerShell works in the context of the current Connection the site it is connected to. Assuming it is connected to a Site Collection, all commands refer by default to that Site Collection. This is different from SPO commands which require you to have Tenant Admin rights. A benefit of the PnP approach is that you can have separate Admin personnel to manage separate site collections or sites if needed.
Overview of Basic SharePoint Operations with PnP PowerShell
1. Connect to PnP Online
Connect-PnPOnline -Url <sitecollectionUrl>
In case, you are not given a prompt for entering your credentials, then create a credential object and pass it to the Connect command.
$user = "<test user>"
$secpasswd = ConvertTo-SecureString "<password>" -AsPlainText -Force
$mycreds = New-Object System.Management.Automation.PSCredential ($siteOwner, $secpasswd)
Connect-SPOnline -url $siteAdminURL -Credentials $mycreds
2. Get the web object using Get-PnPSite and then get the subsites in it
## For Site Collection
$web = Get-PnPSite

## For Sub web
$web = Get-PnPWeb -Identity "<Subsiteurl part only>"
3. In order to work on lists or objects of the site, use the “Includes” parameter to request them or else they will not be intialized.
$web = Get-PnPSite -Includes RootWeb.Lists
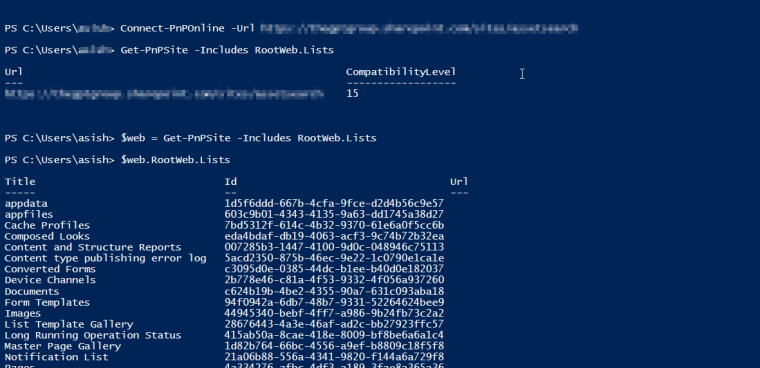
After you get the list object you can traverse it as needed using the object.
4. To work on list items, you must request the list items and same goes for updating the items.
$listItem = Get-PnPListItem -List "Site Assets"
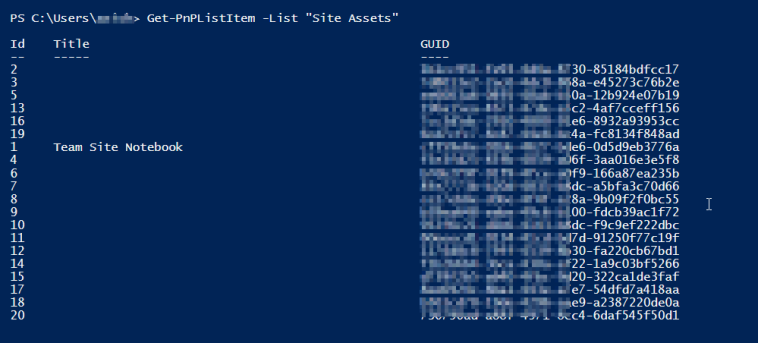
Set-PnPListItem -List "Site Assets" -Identity 2 -Values @{"<column>" = "<value"}

So as we saw above, we could use PnP PowerShell to maintain the SharePoint assets remotely.
Please feel free to let me know, if there is any specific items that are needed and will post about those steps also.

8 Comments